This is default featured slide 1 title

Go to Blogger edit html and find these sentences.Now replace these sentences with your own descriptions.

This is default featured slide 2 title

Go to Blogger edit html and find these sentences.Now replace these sentences with your own descriptions.

This is default featured slide 3 title

Go to Blogger edit html and find these sentences.Now replace these sentences with your own descriptions.

This is default featured slide 4 title

Go to Blogger edit html and find these sentences.Now replace these sentences with your own descriptions.

This is default featured slide 5 title

Go to Blogger edit html and find these sentences.Now replace these sentences with your own descriptions.

All abaut your phone is here
WWW.AMEN87.CO.CC give you all you need for your mobile phone, like Application, Game, Theme, Movie for your mobile phone, Tips & Trick and many more, You can select what do you want to download for your mobile phone at the right of the side bar.

NB: for the movie, for the best to watch the movie, please use Smartmovie or Core player for your Symbian phone.
The movie extension is 3GP and MP4, So you can use the movie in other mobile phone,like Symbian, Java, Blackberry, Android, Windows Mobile/PDA, iPod, PSP, and your PC.
(NB setelah link download file di klik akan muncul jendela baru dan tunggu selama 5 detik nanti akan muncul pemberitahuan di pojok kanan atas SKIP ADD/LANJUTKAN klik link tersebut dan anda akan lansung di alihkan ke tempat dimana anda bisa mendownload file dari saya)

(new update)
special game for PC or laptop you can get FREE in my blog here update from my second blog (AMEN6.BLOGSPOT.COM)

Wednesday, April 11, 2012

OVI MAPS UPDATE 3.06 INCLUDE MAPS INDONESIA S60 5TH


Halo para pengguna GPS Nokia! Kini OVI Maps kembali mengembangkan fiturnya dengan versi terbaru OVI Maps V 3.06. Saya akan bagi lagi OVI Maps versi terbarunya, walaupun agak sedikit terlambat, tapi mudah-mudahan masih bermanfaat untuk kamu.

Fitur OVI Maps V 3.06 :
  • My location, menampilkan peta lokasi dimana kamu berada.
  • Mode tampilan peta : map view, satelite view (membutuhkan akses on-line), terrain view, 3D view, landmarks, dan night mode.


Map view & satelite view


3D dan night mode

  • Detail lokasi berdasarkan titik koordinat.
  • Pilihan untuk lokasi : navigate, save (simpan di panel favourite), share location (via sms/email), dan check in (share to Facebook, Twitter support).

search location


  • Favourite, panel dimana kamu menyimpan lokasi atau rute (route) yang sebelumnya sudah kamu klik save.
  • Drive : just start driving, drive home dan set destination (dengan menentukan lokasi dari map, history, atau search place).
  • Walk : start exploring, walk home dan set destination (sama seperti opsi 'Drive').
  • Weather, informasi cuaca di lokasi terdekat (membutuhkan akses on-line).

prakiraan cuaca di lokasi


  • Calculating route, menghitung serta menentukan jalan menuju lokasi yang sudah ditentukan.
  • Menentukan jarak dan jalur dengan mode : faster route (rute tercepat), optimized (rute optimal), dan shorter route (rute terpendek).
  • Internet access : online/offline, roaming warning, dan network destination.
  • Navigation : Voice guide, backlight, automatic zoom, traffic info update, reroute due to traffic (mengubah rute), time indicator, speed limit warner, safety spot warner, maps improvement (memperbaiki peta).

calculating route to navigate


menu navigasi


  • Route : transport mode (drive/walk), route selection (faster/shorter/optimized), motorway, tunnel, ferry, toll road, unpaved roads, dan train ferry.
  • Map : finding by categories, maximum memory use setting, memory to be used (E: recomended), system of measurement (sistem pengukuran : metric/imperial).
  • At start-up and shutdown / manual synchronisation (upload/download history lokasi ke server dan sebagai data akun OVI pengguna).

Buat kamu yang masih menggunakan OVI Maps V 3.04, cukup kamu instal OVI Maps V 3.06 ini ke ponsel. Kemudian secara otomatis, OVI Maps versi sebelumnya akan diganti dengan OVI Maps yang terbaru.

Download OVI Maps V 3.06 :
OVI Store http://store.ovi.com/content/100493
Mediafire http://www.mediafire.com/?pdkkftzthdiahpl

Sudah pasti kamu yang sebelumnya menggunakan OVI Maps V 3.04 kemudian update ke OVI Maps V 3.06, akan muncul notifikasi setelah membuka program seperti ini : old map not supported, erase map now?
Itu pertanda map OVI Maps V 3.04 sudah tidak bisa lagi digunakan. Jadi kamu tekan 'Yes" saja untuk menghapusnya. Dan kamu bisa dapatkan Indonesia Map untuk OVI Maps V 3.06 disini.

Selamat bernavigasi dengan OVI Maps Nokia V 3.06 terbaru, dan check in lokasi dimana saja.

Semoga anda tidak pernah nyasar lagi wkwkwkwkwkwkwkwkwkwk..........


Tuesday, December 27, 2011

Tuesday, December 20, 2011

Jika ingin membuat Bootable win 7, silahkan klik disini untuk melihat tutorialnya. Pengen punya bootable CD atau DVD Operating System Windows sendiri

Pengen punya bootable CD atau DVD Operating System Windows sendiri??? Gampang aja, kalian tinggal buat sendiri menggunakan aplikasi software Nero. Kalian bisa membuat bootable CD/DVD Windows 2000, Windows XP, ataupunWindows Vista. Dalam tutorial ini saya menggunakan software Nero ver. 8.3.1.2 dan mencoba membuat DVD Windows XPsebagai contoh.

1) Persiapan
Apa aja sih yang dibutuhkan untuk membuat bootable CD/DVD Windows???
- Software Nero harus sudah diinstal di komputer kamu tentunya.
- Back up-an dari ISO atau CD/DVD asli Windows 2000/XP/Vista.
- File “boot.ima (download disini)
- Minimum tersedia 1GB free space hard disk untuk membuat CD bootable
- Minimum tersedia 4GB free space hard disk untuk membuat DVD bootable

2) Langkah-langkah

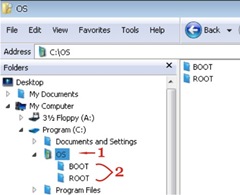
OS Folder

1. Buat sebuah folder dengan namaOS di hard drive kamu.
(saya menggunakan hard drive C:\dalam contoh ini)

2. Setelah itu buat 2 buah folder dengan nama BOOT dan ROOT.

- Copy file boot.ima yang sudah kamu download tadi ke folder BOOT.

- Copy semua file beserta folder-folder dari CD/DVD (atau extract ISO) Windows XP ke folder ROOT.

3) Jalankan/Run “Nero Burning ROM”

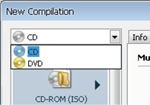
Option CD/DVD

Jalankan aplikasi Nero Burning ROM kamu, lalu pilih salah satu dari pilihan CD atau DVD sesuai dengan disk bootable yang ingin kamu buat. Karna akan membuat DVD bootable, saya memilih DVD tapi jika kamu mau membuat CD bootable maka pilih optionCD.

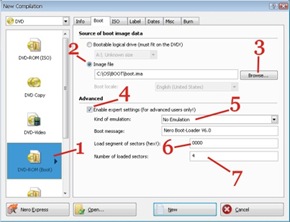
Tab Boot

1. Setelah memilih option DVD, lalu pilih option “DVD-ROM (Boot) yang ada di menu sebelah kanan.
(jika kamu akan membuat CD bootable, maka kamu pilih option “CD-ROM (Boot)”)

2. Pilih/clik button Image file, Setelah itu clik tombol browse.

3. Setelah mengclik tombol browse, lalu pilih file boot.ima yang ada di folder C:\OS\BOOT\boot.ima.
4. Check “Enable expert settings (for advanced users only!).
5.
Atur “Kind of emulation:” menjadi “No Emulation.
6.
Atur “Load segment of sectors (hex!):” menjadi “0000” (nol nol nol nol).
7. Atur “Number of loaded sectors:” menjadi “4” (empat).

Setelah mengatur settingan di tab Boot, sekarang kita setting tab ISO.

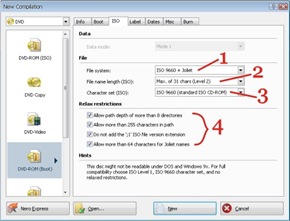
Tab Iso

1. Biarkan settingan “File system” tetap “ISO 9660 + Joliet”.
2. Atur “File name length (ISO)” menjadi “Max. of 31 chars (Level 2)”.
3. Atur “Character Set (ISO)” menjadi “ISO 9660 (standard ISO CD-ROM)”.
4. Check semua “Relax restrictions”.

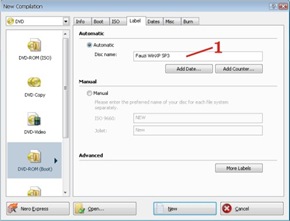
Setelah mensetting tab ISO, clik tab Label untuk mensetting nama disk bootable.

Tab Labels

1. Silahkan beri nama CD/DVD bootable kamu sesuai dengan nama yang kamu inginkan. Saya memberi nama DVD bootable yang saya buat dengan Fauzi WinXP SP3sebagai contoh.

Setelah mensetting nama bootable CD/DVD yang kamu inginkan, clik tab Burn.

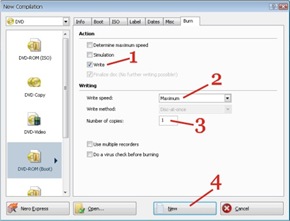
Di tab Burn ini kamu dapat mensetting kecepatan burn/membakar CD/DVD sesuai dengan yang kamu inginkan. seperti pada gambar Tab Burn dibawah ini.

Tab Burn1. Check “Write”.

2. Atur “Write speed” menjadi “Maximum”.

3. Atur “Number of copies” menjadi “1” (satu).

4. Setelah itu clik tombol “New”.

4) Memulai Pembakaran/burn CD/DVD Bootable
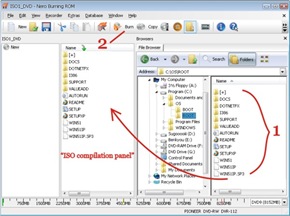
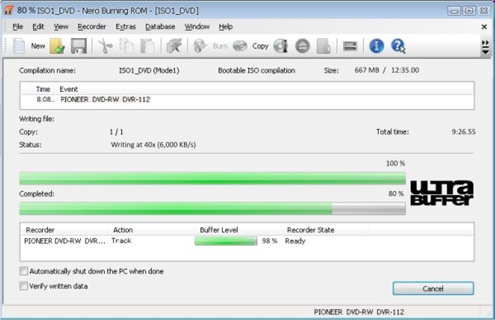
Setelah meng-clik tombol New tadi kamu akan masuk ke tab ISO1_DVD – Nero Burning ROM seperti gambar di bawah ini.

ISO1_DVD – Nero Burning ROM

1. Select all semua file yang ada di folder “C:\OS\ROOT” kemudian drag/tarik ke “ISO compilation panel” (seperti gambar di samping).

2. Setelah men-drag semua file yang ada di folder “C:\OS\ROOT”, clik tombol “Burn”.

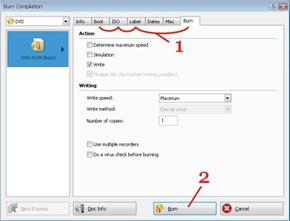
Kamu akan masuk kembali ke tab Burn setelah mengclik tombol Burn tadi.

Verifycation

1. Verify/periksa kembali tab Boot, tab ISO, tab Label, dantab Burn yang sudah disetting tadi, jika ada yang terlupa.

2. Clik tombol “Burn” untuk memulai pembakaran/burning.

Setelah menekan tombol Burn maka proses pembakaran/burning pun dimulai.

Proses Burning

Tunggu hingga proses burning selesai, dan kamu akan punya CD atau DVD operating system Windows 2000/XP/Vistasendiri.

Total Video Converter 3.71 With Serial Number (CRACK)


Buat anda yang suka nonton video lewat ponsel, PDA, PSP, iPod, iPhone atau kamera digital, di karenakan beberapa gadget tersebut tidak bisa memutar sembarang format video ada yang 3gp, mp4, avi atau dll, anda bisa menggunakan program ini TOTAL VIDEO CONVERTER

ini dia gan penampakan nya
silahkan srupt disini:

Thursday, September 15, 2011

Transform Windows 7 into Max OS X Lion


Mac OS X Lion DP3Mac OS X Lion DP3

Mac OS X Lion DP3Mac OS X Lion DP3

Mac OS X Lion DP3Mac OS X Lion DP3


This CustoPack takes its inspiration from the "developer preview" of Mac OS X Lion and it will tranform the design of your Windows 7 into a real feline!


The version 1.1 of CustoPack Tools is running a little behind but it will be available very soon.
During the installation of the Mac OS X Lion Inspirat CustoPack, you must enable the additional softwares in order to enable "Hideblur" which will disable blur around the windows.
Finally, if you want to add a shadow to the taskbar, I invite you to discover Taskbar Drop Shadow application.

Good download : ) !